[OS X Internals] CH.5 Non Sequitur
by Jo
Process Tracing and Debugging
OS X에는 다양한 debugging tool과 개선 사항이 포함되어 있어 매우 편리하며 GDB를 호출하기 전에 문제를 분석하는데 도움이 된다.
DTRACE
DTrace 는 Sun의 Solaris에서 이식된 debugging platform이다.
이 tool을 이용하면 OS X를 debugging 할때 큰 도움이 된다.
The D Language
DTrace 의 “D” 는 D Language를 나타낸다. 이것은 완전한 tracing language로, 특수 tracer나 probe를 작성할 수 있다. D는 AWK 의 model을 따르는 constrained language로, 기본적인 flow control 조차 부족하며 language에서 loop가 완전히 제거되엇다. 이것은 D script가 kernel code에 의해 compile되고 execute 되기 때문에 의도적으로 이루어졌으며, loop는 너무 길거나 무한할 위험이 있기 때문이다. 그러나 이런 제약에도 불구하고 DTrace는 ptrace 의 기능에 필적하는 뛰어난 추적 기능을 제공한다.
DTrace는 XCode의 instrument tool의 기초를 형성한다. 최소한 XCode의 instrument tool은 운영 체제에서 나온 최고의 debugging 및 profiling tool이다. instrument를 사용하면 “custom” instrument를 만들 수 있다. 이 tool은 실제로 raw D script를 wrapping 하는 것이다.
많은 Solaris D script는 Solaris의 주석까지 포함해서 그대로 OS X에 복사되었다. 일반적으로 다음 두 가지 유형 중 하나이다.
- Raw D scripts: .d extension으로 명확하게 식별 가능하며 UNIX에서 script에 공통적인 #! magic 사용하여 /usr/sbin/dtrace -s 에 따라 실행되도록 설정되어있다. kernel이 load하도록 request 하면 #!는 실제 DTrace binary로 redirection된다. 이러한 script는 일부 variable을 직접 editing 하고 changing 할 수 있지만 argument를 accept 하지 않는다.
- D script wrappers: shell 기능을 사용하여 user argument를 처리하고 내부 D script(simple variable interpolation에 의해)에 포함시키는 shell script(#!/bin/sh)이다. 실제 기능은 여전히 DTrace(/usr/sbin/dtrace -n)에 의해 제공되지만, 보통은 숨겨져있다.
.d extension으로 인해 system에서 모든 raw script를 쉽게 찾을 수 있다.(find /-name “*.d” 2>/dev/null). 두 종류에 해당하는 script 모두 해당하는 man page를 가지고 있으며, 이를 모두 찾는 좋은 방법은 dtrace keyword로 검색하는 것이다. 이 script들은 모두 “Uses DTrace”를 description에 가지고 있다.
dtruss
dtruss 는 DTrace 에 의해 지원되는 기능으로, Solaris의 longtime turss tool과 동일하다. linux에는 이에 대응하는 기능으로 strace가 있다. 둘 다 c와 같은 form으로 call 을 print 하여 system call, arguments, return value를 표시하여 system call trace를 가능하게 한다. 이것은 kernel boundary까지 user mode의 뒷면을 보기 위한 수단으로 중요하다.
linux의 strace와는 달리 dtruss 는 추가 단계를 수행하고 structure에 대한 pointer를 dereference 해서 field에 대한 detail한 informatino을 제공하기에 충분하지 않다. 그러나 character data를 표시할 만큼 강력하므로 file name이나 string data를 허용하는 대부분의 system call에 유용하다.
다음과 같은 세 가지 사용 mode가 있다.
- dtruss 에서 process 실행: dtruss 뒤에 command와 argument를 지정
- running process에 특정 instance를 attach: dtruss -p argument로 PID 지정
- named process에 attach: 이름을 dtruss -n argument로 지정
dtruss 의 또 다른 유용한 특징은 하위 process에 자동으로 latch하는 기능이다(specify - f). trace된 process가 다른 process를 생성할 때 좋다.
dtruss tracer 및 profiler 로 모두 사용할 수 있다. default는 모든 system call을 trace하여 매우 자세한 output을 나타낸다.
-s를 추가하면 더욱 유용한 output을 얻을 수 있다. -s는 system call로 이어지는 call의 stack trace를 제공한다. 이는 call 이 시작된 executable의 일부 또는 library를 분리하는 데 유용하다. debugging symbol이 있는 경우(-g로 compile 되고, companion인 .dSym file이 있는 경우) code line을 pinpoint로 찾을 수 있다.
profiling을 위해서는 -c, -d, -e 및 -o switch가 편리하다. 첫 번째는 system call의 summary를 print하고, 다른 하나는 system call에 소비된 다양한 time을 print한다.
DTrace script와 dtruss 를 사용하는 주요 이점은 remote execution이 가능하다는 것과 textual format이어서 grep 이용이 가능하다는 것이다. GUI가 필요할 경우 instrument application가 timeline-based navigation 및 data의 임의 확대/축소 level을 가능하게 하는 뛰어난 GUI를 제공한다.
How DTrace Works
DTrace 는 probe가 kernel에서 execute 될 수 있도록 하여 debugging을 달성한다. DTrace 의 user mode 부분은 /usr/lib/dtrace.dylib 에 의해 실행되며, 이는 instrument 및 script interpreter인 /usr/sbin/dtrace 에 공통이다. 이것은 D Script 를 compile 하는 runtime system 이다. 그러나 대부분의 유용한 script은 kernel mode에서 execution 된다. Dtrace library는 특수 문자 장치_(/dev/device)_ 를 사용하여 kernel component와 communicate 한다.
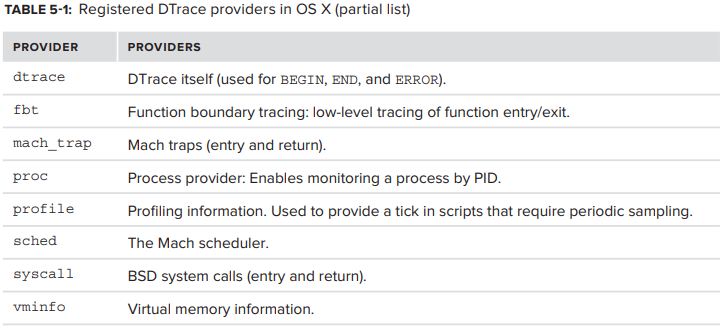
Snow Leopard에는 약 40개의 DTrace provider가 있으며, Lion에는 약 55개가 있지만 이 중 일부만이 kernel에 있다. dtrace -l을 사용하면 모든 providers list가 생성되지만 function name에 대한 여러 instance가 있는 PID instance가 포함된다. 실제 provider 이름 list를 얻으려면 PID number를 제거한 다음 고유한 일치 항목만 filtering 하는 것이 좋다.
kernel에 등록 된 주요 DTrace provider는 다음 표와 같다.
OTHER PROFILING MECHANISMS
OS X에서의 trace mechanism이 DTrace 밖에 없는 것은 아니다. 다른 대안들도 존재하며 특히 DTrace 가 존재하지 않는 iOS에서 더 중요하다.
The Decline and Fall of CHUD
OS X와 iOS에는 CHUD (Computer Hardware Understanding and Development) 라는 framework가 있었다. Lion 부터는 OS X에서 삭제되었으며, iOS 에서는 비공개적으로 사용되고 있을 수 도 있다.
AppleProfileFamily: The Heir Apparent
CHUD가 사라졌을 수도 있지만 그 본질은 남아있다. OS X 및 iOS 모두에서 profiling은 private AppleProfileFamily.framework (및 이를 기반으로 하는 CoreProfile.framework)에 의해 수행된다. 이 framework는 후자의 버려진 kernel callback을 사용하고 다양한 dedicated profiling kexts와 communicate한다는 점에서 CHUD와 유사하다.

OS X에는 Intel profiling을 위한 추가 kext가 있다. 이 kext는 주로 buffer 및 memory 크기를 control 하기 위해 appleprofile parent(triggers, actions 및 pmcs) 아래에 여러 sysctl MIB 를 등록한다.
다른 구성 요소인 /usr/libexec/appleprofilepolicyd 는 user mode로 유지되며 arbiter 및 policy decision maker 로의 역할을 한다.
PROCESS INFORMATION
OS X는 DTrace 외에도 ps, lsof, netstat 등등에서 사용하는 것과 같은 open된 handles, memory utilization, 기타 statistics 등의 detail한 process information을 얻을 수 있는 2가지 key mechanism을 제공한다.
sysctl
sysctl mechanism은 process와 관련된 statistics를 표시하는 variable을 제공한다. 이 mechanism은 process ID list를 얻기 위해 중요하다(ps와 top 에서도 process ID list를 얻기 위해 이 방법을 사용).
kern namespace는 CTL_KERN 에서 KERN_PROCARGS 및 KERN_PROCARGS2 MIB를 expose 한다. 이는 process의 argument 및 environment를 retrieve 하기 위해 system에서 PID의 세 번째 level MIB 값과 함께 사용될 수 있다.
proc_info
OS X와 iOS는 둘 다 proc_info system call을 제공한다. 이 undocumented system call(#336) 은 lsof 및 fuser 와 같은 많은 system utility의 기본이다. 자체 include file_(sys/proc_info.h>)가 장점이지만, system call은 잘 숨겨져 있으며 Darwin의 LibC 의 일부인 libproc.dylib 의 header file인 _<libproc.h> 를 통해 access 해야 한다(따라서 libSystem의 일부이다).
proc_info 를 사용하면 process 및 thread의 여러 aspect를 query할 수 있다. 이 중 가장 중요한 것은 file descriptor와 socket을 사용하는 것이다(이런 이유로 lsof-like tools가 중요하다.). sysctl 은 kernel space에서 address를 show 할 수 는 있지만 그것들을 read 할 수는 없기 때문에 /dev/kmem 을 사용할 수 없다는 점에서 (모든 시스템에서 default) 이것이 system 에서 가장 중요하다.
PROCESS AND SYSTEM SNAPSHOTS
Dtrace 및 instrument 외에도 OS X 에는 system 또는 process state의 “snapshots”을 생성할 수 있는 몇 가지 tool이 있다.
system_profiler
system_profiler utility는 graphical System Profiler.app 의 command line version이다. graphical version 이 유용하지만(또한 기억하기 쉬운 Speak Serial Number option을 제공) command-line처럼 편리하지 않다. command line은 terminal에서 실행되어 filtering option이 더 크더라도 기본적으로 동일한 output을 생성할 수 있다. report는 plain text 또는 XML로 저장할 수 있다.
sysdiagnose
Lion의 새로운 기능인 sysdiagnose 는 one-stop comprehensive diagnostics utility 이다. 이것은 gzip에 의해 tar 로 압축, 아키이브 된다. 이 tool 은 Apple에게 system에 대한 완전한 diagnose를 제공하고 Apple에게 보낼 수 있는 report를 작성하기 위한 것이다.
실제로 sysdiagnose 는 여러 다른 utility를 차례로 실행하고 ASL log 및 기타 file을 수집하는 wrapper에 지나지 않는다.
이 tool의 편리한 기능은 key chord(Control-Option-Command-Shift-Period)로 finder에서 실행할 수 있다는 것이다.
command line에서 실행하면 PID 또는 process 이름을 지정할 수 있는 이점이 있다. 또한 full kernel trace 및 unflattered allmemory data를 제공하는 thorough mode를 지정(-t switch를 사용)할 수 있다.
allmemory
allmemoroy tool은 user mode process 별로 모든 memory utilization의 snapshot을 capture하는 데 사용된다. 이 tool은 실행될 때 system 의 모든 process를 iterate 하고 memory map을 /tmp/allmemoryfiles (또는 -o switch 에 의해 지정된 다른 위치) 의 file로 dump한다. dump는 간단한 plist format으로, “diff” mode 에서 실행될 때 snapshot을 비교하기 위해 third party tool 또는 allmemory 자체에 의해 parsing 하는데 적합하다. process 별 vmmap 과 달리 allmemory 는 다른 process 별로 유사한 memory segment utilization을 비교하여 system wide memory utilization을 표시할 수 잇으며 shared memory 에 focus를 맞춘다.
모든 process memory snapshot을 얻은 후 allmemory 는 각 process와 framework memory utilization 에 대한 aggregate statistics를 표시한다.
stackshot
OS X 및 iOS에서 잘 알려지지는 않았지만 매우 유용한 기능은 process execution state의 snapshot을 생성하는 기능이다. 두 system 모두 주어진 process의 모든 thread의 state를 capture하는 데 사용할 수 있는 비공개 및 undocumented system call인 stack_snapshot(#365) 를 제공한다.
이 system call의 main user는 기술적으로 on-demand daemon인 stackshot command 이며, /usr/libexec 에 숨겨져있다. 이 명령은 com.apple.stackshot.plist 에서 launchd 로 실행되지만 수동으로 실행할 때 더 유용하다. 특정 PID를 (-p switch로) 단일화 하거나 system의 모든 process를 수행할 수 있다. -f switch로 재정의 하지 않는 한 기본 log file은 /Library.Logs/stackshot.log 에 저장된다. daemon의 plist에 Trace Server key를 지정하여 remote server로 log를 보낼 수도 있다. 일반적인 용도는 -i switch를 사용하여 즉시 snapshot을 생성하고 종료하는 것이다.
man page에 출력을 symbolification 할 수 있는 switch로 “-u” 가 표시되어 있는데 이건 실제로 command line에서 지원하지 않는다.
Lion에서 stackshot 명령이 sysdiagnose 명령과 통합되어 향상되었다. 위에서 설명한 이 command는 수많은 다른 data 및 log와 함께 모든 process의 stack snapshot을 수집한다. stackshot 에는 sysdiagnose 와 독립적으로 실행되는 자체 keychord가 있다.
The stack_snapshot System Call
XNU의 stack_snapshot system call은 system call number 365 이기 때문에 <sys/syscall.h> 에서만 의무적으로 언급된다. 문서화는 되지 않았다. stackshot command 조차도 syscall wrapper를 통해 이를 호출한다.
KDEBUG
XNU 에는 kdebug 라는 내장 kernel trace facility 가 있다. 이 기능은 OS X 와 iOS 모두에 존재하지만 sysctl 설정으로 enable 하지 않는 한 default르 disable 되어 있다. 여러 지점에서 kernel은 특별한 KERNEL_DEBUG_CONSTANT macro로 묶여있다. 이 macro를 사용하면 system call, mach trap, file system operation 및 IOKit trace와 같은 주목할 만한 event 를 trace 할 수 있다. 이는 event 발생 자체 외에 매우 적은 extra information 이 이러한 방식으로 recorded 될 수 있음을 의미한다.
kdebug-based Utilities
OS X는 kdebug 기능을 활용하는 세 가지 utility를 제공한다. fs_usage, sc_usage 및 latency tool은 모두 작동하기 위해서 root privilege를 필요로 하지만, 유용한 debugging 및 tracing information을 제공한다. kdebug message는 압축된 encoding format 이므로 이러한 utility (특히 sc_usage) 는 “code” file인 /usr/share/misc/trace.codes 의 존재에 의존한다. 이 file은 iOS에 존재하지 않지만, copy 할 수 있다.
sc_usage
sc_usage tool은 process 별로 system call information을 display 하는데 사용된다. command는 기존 process(PID 또는 process name으로 지정됨) 에 attach하거나 새 process(-E로 호출된 경우) 를 실행할 수 있다. 이 도구는 “watch” style mode에서 실행하여 화면을 지속적으로 update 하거나 (-l로 호출된 경우), output을 지속적으로 display 할 수 있다.
fs_usage
fs_usage 를 사용하여 자매 utility와 마찬가지로 system call을 display 할 수 있지만 이 경우에는 file, socket 및 directory와 관련된 것이다. 형제와 달리 system wide하게 수행된 call을 display 할 수 있다(PID 또는 command argument로 호출된 경우).
latency
latency tool은 interrupt 및 scheduling의 latency value를 display 한다. -it 또는 -st switch로 각각 setting 할 수 있는 context switch 및 interrupt handler가 threshold 내에 있음을 보여준다.
kdebug codes
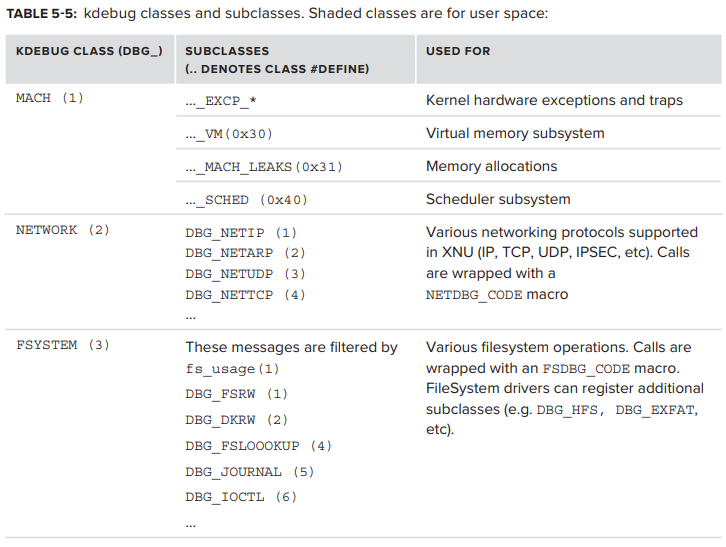
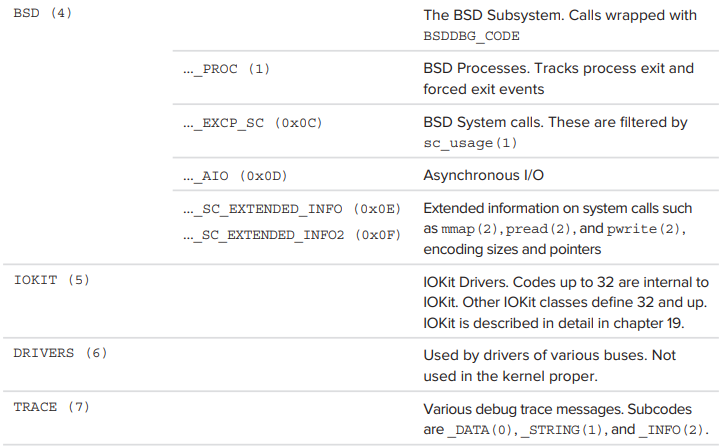
**kdebug는 logging을 위해 kernel buffer를 사용하며 buffer space는 매우 제한적이다. 따라서 모든 debug “message” 는 class, subclass 및 code를 압축해야 하는 32-bit integer code를 사용한다.
format 은 다음 그림과 같으며, <sys/kdebug.h> 에 정의되어 있다.

kdebug message class 는 kernel subsystem 에 해당하며, 다시 특정 subclass를 가진다. 이것들은 <sys/kdebug.h> 에 정의되어 있으며, header file에는 실제로 사용되지 않는 일부 subclass도 있다.
key class와 subclass는 다음과 같다.


Writing kdebug messages
kdebug 기능은 XNU 에서 광범위하게 사용되지만, application들은 Apple 자체의 일부 application들이 하는 것처럼 application 자체의 message를 logging 하기 위해 kdebug 를 사용할 수도 있다. 그러나 kdebug_trace system call(#180)은 의도적으로 undocumented 되어있다. 심지어 그것을 사용하는 open source application도 syscall을 직접 호출한다. Listing 5-3에서 볼 수 있듯 이것은 launchd 에서 확인할 수 있다.
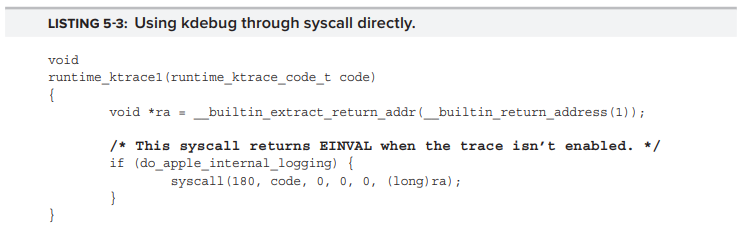
kdebug_trace system call은 실제로 최대 6개의 argument(system call의 최대 값) 를 사용할 수 있다. KERNEL_DEBUG_CONSTANT 는 현재 thread의 ID로 다섯번째 argument를 pre-initialize 한다. system call 구현과 KERNEL_DEBUG_CONSTANT code path는 결국 실제 debugging을 수행하는 kernel_debug_internal() 에 도달한다.
그러나 두 경우 모두 실제 kdebugging path는 먼저 global kernel variable인 kdebug_enable 이 0이 아닌 값으로 설정되어 있는지 확인한다. 이 variable은 수동으로 설정하지 않는 한 0 이다. kernel_debug_internal() function은 6개의 argument를 가져와서 timestamp와 함께 structure kd_buf 에 쓴다. CHUD 를 사용하면 callback을 등록하여 모든 kdebug event에서 call할 수 있다.
Reading kdebug messages
application은 sysctl call을 사용하여 kdebug 를 enable 하고 user mode에서 message를 read할 수 있다. kdebug 를 사용하려면 kdebug_enabe 을 0이 아닌 값으로 설정해야한다. 이 variable은 user mode에서는 보이지 않지만 sysctl 을 사용하여 접근할 수 있다.
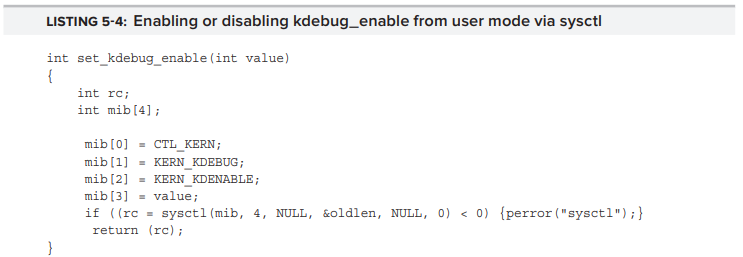
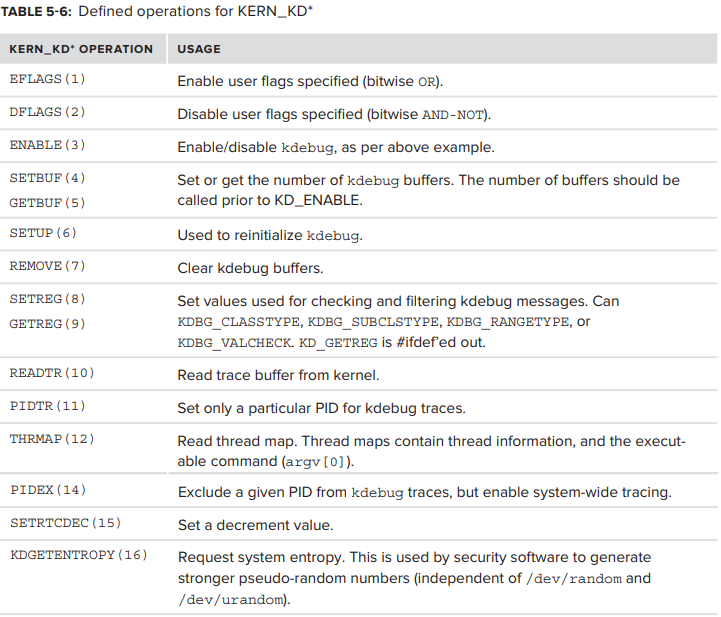
위 예시에서 사용된 KERN_KDENABLE operation은 CTL_KERN.KERN_KDEBUG sysctl 에 전달될 수 있는 control code 중 하나일 뿐이다.
현재 define 되어 있는 operation 들이 Table 5-6에 나와있다.
APPLICATION CRASHES
인생의 불행한 진실은, 조만간, 대부분의 application들은 crash 한다는 것이다. UNIX의 경우, crash는 signal과 연관되어 있다. crash가 발생하는 진짜 이유는 process가 단순히 execution을 계속할 수 없다고 판단한 후, 마지막 수단으로 signal을 발생시키는 kernel code 때문이다 (kernel crash report, “panic” 과 개념상 유사해 보이지만 둘은 다르다).
Core Dumps
process가 crash 하면 optional하게 core dump 가 생성될 수 있다. 이는 process의 RLIMIT_CORE resource limit에 따라 다르다. process는 setrlimit 을 사용하여 이 value를 제한할 수 있지만 user가 ulimit command를 사용하는 것이 더 일반적이다. ulimit -c 에 의해 report 된 value 가 0면 core dump 가 작성되지 않음을 의미한다. 그렇지 않은 경우엔 일반적으로 /cores directory에 지정된 size의 core file이 create 된다. 작성된 core는 다음 예시와 gdb 로 debugging 할 수 있다.
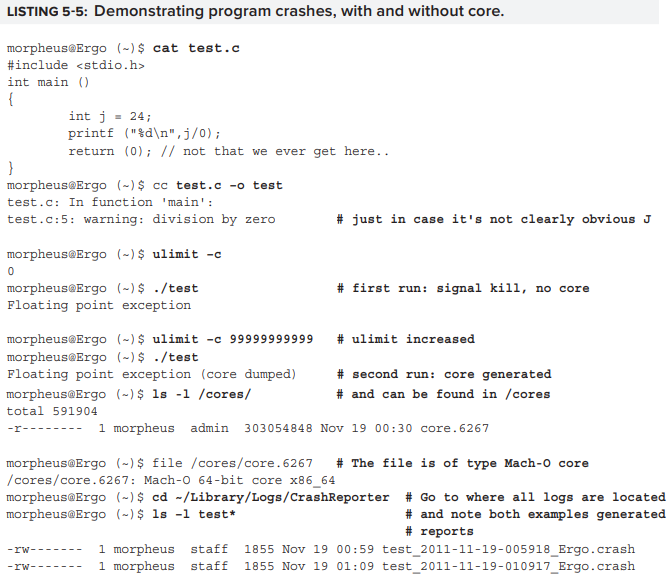
core file creation은 일반적으로 user level에서는 default로 disable 되어있다. 즉, ulimit -c가 0으로 설정 되어있다. 위의 예시에서 볼 수 있듯 3줄짜리 program도 300 MB에 가까운 core를 형성하기 때문이다.
system의 모든 process는 궁극적으로 launchd 의 descendant 이므로 launchd 의 limit을 설정하여 global basis로 re-enable 할 수 있다.
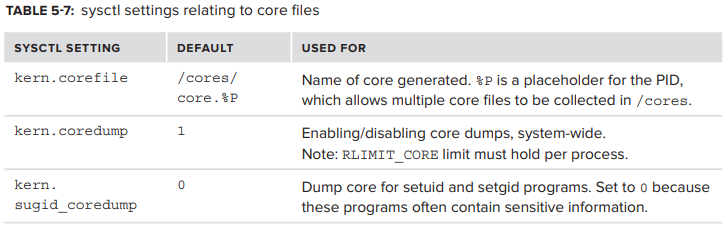
system level에서 core file은 sysctl 에 의해 control 될 수 있다.
Table 5-7에 표시된 설정이 적용 가능하다.
Crash Reporter
huge core file을 처리하는 대신 iOS와 OS X 모두 CrashReporter 를 포함한다. Crash Reporter 는 process가 abend(abnormal end, i.e. crash)할 경우 자동으로 trigger 되며 자세한 crash log를 생성한다. 이 mechanism은 종료되기 이전 process에 대해 신속하고 기초적인 analysis 를 수행하며 highlights를 crash log에 record 한다.
iOS 및 OS X 모두에서 CrashReporter log 는 user의 /Library/Logs/CrashReporter 또는 system-wide /Libray/Logs/CrashReporter 로 전송된다. 최신 버전의 OS X에서 이 directory는 ../DiagnosticRepors 에 대한 symbolic link 이다. report 이름은 process_name_YYYY-MM-DDHHMMSS_hostname.crash convention을 따른다.
crash report 는 문제가 발생한 원인에 대한 기본적이지만 대체로 충분한 analysis를 제공한다. architecture(i.e. i386, x86_64 또는 ARM 등) 에 따라 format이 다를 수 있지만 Output 5-7 에 표시된 것과 동일한 basic structure를 항상 따른다.
다음 예시는 iOS process crash에서 발생한 report 이며, italic으로 된 field는 iOS에만 해당하는 field 이다.

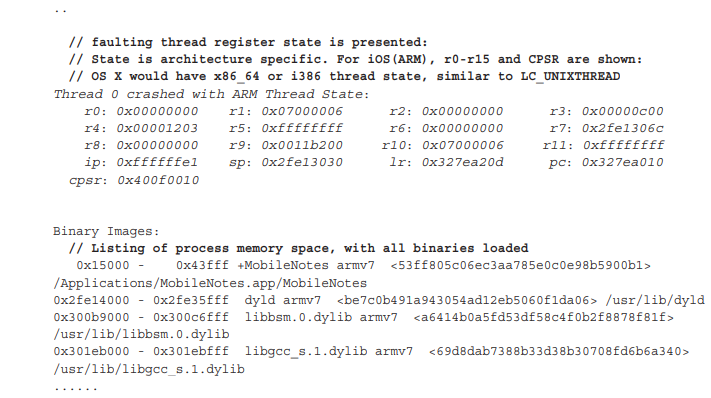
faulting thread의 stack trace는 종종 pinpoint로 problem을 나타낸다. source code에 직접 연결할 debugging symbol이 없더라도 otool -tV와 같은 disassembler를 사용하여 call trace로 이어지는 event sequence를 파악할 수 있다.
Changing Crash Reporter Preferences
Xcode 사용시 /Developer/Applications/Utilities 에 CrashReporterPrefs 라는 작은 application을 이용해서 Crash Reporter 설정을 바꿀 수 있다.
또는 DialogType property를 basic, developer, 또는 server로 toggle하여 OS X의 default utility를 사용하여 동일한 목적 달성할 수 있다.
Application Hangs and Sampling
때때로 application은 crash 되지 않고 무한정 중단될 뿐이다. 이것은 대체로 더욱 좌절스러운데, user가 할 수 있는 것은 그저 끊임없이 돌아가는 rainbow wheel을 바라보며 다시 반응할 수도, 그렇지 않을 수도 있는 application의 자비에 기도하는 것 뿐이기 때문이다.
GUI는 Force Quit option을 제공한다. 이 option은 실제로 잘못된 application에게 signal을 보낼 뿐이다. Optional하게 user는 “report” 를 선택할 수 있다. 해당 report는 spindump 를 사용하여 생성된다. spindump 는 system의 모든 process를 probe하고 현재의 call stack을 얻는다(이 tool은 Lion의 sysdiagnose tool 이다). 그런 다음 log는 CrashReporter log와 유사하지만 extension이 .hang인 user(또는 system)의 /Library/Logs/DiagnosticReports 에 기록된다.
root user는 spindump 를 수동으로 execute할 수 있다. 또는 sample 을 사용하여 특정 process에 대한 snapshot을 작성할 있다. 이 tool(spindump 와 동일한 argument 사용)은 user 자신의 process에서 sampling이 수행될 경우 non-root user가 실행할 수 있다. sample log도 CrashReporter format으로 되어있어 상세한 stack trace와 load된 dylib information을 제공한다.
두 경우 모두 sampling method가 유사하다. 즉, process가 suspend되고 stack trace가 record 한 다음(spindump 는 위에서 설명한 stack_snapshot syscall 을 사용한다), 다시 resume 된다. sampling interval은 보통 10 milliseconds이며, sampling은 10초동안 이루어진다. 두 설정 모두 configurate 할 수 있다.
XCode는 또 다른 tool인 Spin Control 을 제공한다. 이 작은 app은 rain bow wheel 이 display 될 때마다 (CoreGraphics 를 통해) 자동으로 sampling을 수행한다. 이 tool의 유일한 장점은 textual report 보다 다소 직관적인 call-graph browser 이다.
filtercalltree 라는 또 다른 utility가 있는데, 이 utility는 sample 이나 malloc_history 등의 call trace log를 처리하는 것이 목적이다.
Memory Corruption Bugs
memory corruption은 program bug의 일반적인 원인이다. application crash의 주요 원인은 buffer overflow(stack 및 heap)과 heap corruption 이다. 문제는 대부분의 경우 원인과 결과가 code의 여러 line에 떨어져 있고, bug가 crash를 발생시킬 때 까지 몇 분 또는 그 이상이 걸릴 수 있다는 점이다.
Memory Safeguards in LibC
OS X의 LibC 는 configuration이 매우 용이하며, Table 5-8 과 같이 malloc page에 documented 된 여러 environment variable 중 하나에 의해 memory allocation을 control 할 수 있다.
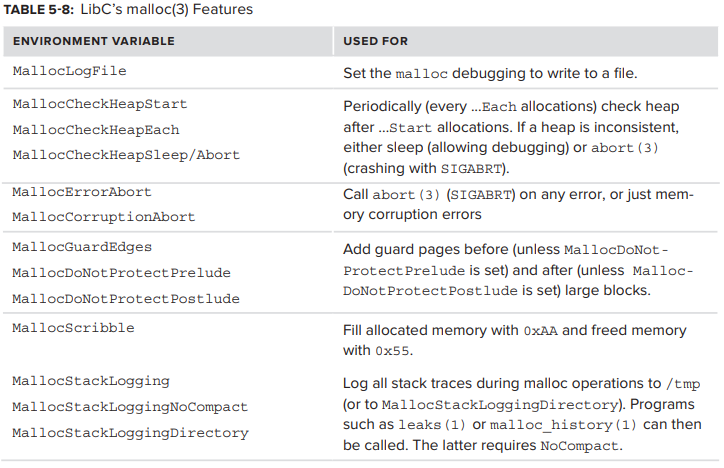
environment variable은 set 되었을 때 시작된 모든 process(output을 처리하는 command 포함) 에 영향을 미치므로 variable을 export 하는 대신 trace된 command 앞에 variable setting을 붙여 두는 것이 좋다. 또한 MallocStackLogging 과 같은 variable의 export는 “unset” 항목으만 대응할 수 있다. LibC 는 setting한 만큼 그 value에 신경쓰지 않기 때문이다.
OS X의 memory-leak detection tool은 이러한 LibC 기능을 기반으로 memory allocation을 tracking 하는 광범위한 기능을 제공한다.
LibGMalloc
지금까지의 memory protection feature가 충분하지 않은 경우 OS X는 memory allocation을 intercept하고 debug하는데 사용할 수 있는 특수 library인 libgmalloc.dylib 를 제공한다. 이 강력한 library는 LibSystem 의 allocation function을 interposing 하여 작동한다(ch.4 dyld 의 “Function Interposing” 참조). function이 hook 되면 그것들을 더 상세한 다른 function으로 간단하게 replace 할 수 있다. 또한 조금의 transgression으로 인해 crash가 발생하기를 바라며 memory allocation에 더 많은 constraints를 setting하기도 한다.
특히 libgmalloc 은 다음과 같은 technique을 사용한다.
- 중요한 allocation detail을 recording한 debug information이 포함된 각 allocated chunk에 custom header 추가: header는 0XDEADBEEF의 constant value(“magic number”) 와 함께 할당시 thread ID 및 backtrace를 record 하는데, 동일한 buffer의 allocation 및 reallocation error를 detecting 하는데 유용한다.
- own page에 chunk를 allocate 하여 neighboring page에 unwritable(MALLOC_ALLOW_READS 가 set 되어 있을 경우) 하거나 전체에 access 할 수 없는 경우: allocated chunk도 page의 끝으로 push 된다 (MALLOC_PROTECT_BEFORE 가 set 되지 않은 경우).결과적으로, buffer의 end를 지나는 read/write operation은 자동으로 page boundary를 지나서 read/write operation이 되고 unhandled page fault가 발생하여 bus error(SIGBUS) 와 함께 그 자리에서 process가 crash 된다. MALLOC_PROTECT_BEFORE environment variable을 set 하면 overrun이 아닌 buffer underrun을 방지하기 위해 동작이 반전된다.
- chunck 를 해제하여 memory를 deallocate: library는 free() 에서 해당 page를 deallocate 하고, 해제된 buffer에서 read/write operation이 수행되면 다시 bus error가 발생한다.

발생한 bus fault는 자동적으로 memory handling bug의 존재를 드러내며 debugging을 비교적 단순하게 만든다. gdb 를 부착하면 crash를 정확히 파악할 수 있으며, (custom header를 검사하여) allocation으로 다시 돌아가 buffer allocation parameter를 change 하거나 offending operation을 remove 할 수 있다.
MEMORY LEAKS
또 다른 일반적인 application bug는 leaking memory 이다. programmer가 memroy나 object를 allocate 하고 free() 혹은 delete를 call 하지 않았을 경우 발생한다. memory leak는 critical bug가 아니므로 발견하기가 어렵다. pointer를 lost하면 memory를 reclaim 할 방법이 없으므로 process의 address space를 천천히 낭비해나간다.
32-bit process의 경우 process memory를 다 고갈시킬 수 있기 때문에 이는 심각한 문제로 변질될 수 있다.
64-bit process의 경우 address space가 매우 크기 때문에 긴급한 문제는 아니지만 physical memory(특히 mobile device) 나 swap 에는 여전히 상당한 피해를 줄 수 있다.
이 section에 설명된 tool 외에도 XCode의 Instrument 는 timeline-based GUI를 사용하여 방대한 양의 sampling output을 조사할 수 있는 interactive 방식의 detail한 방법을 제공한다. Instrument 에는 memory allocation 및 memory leak을 tacking 하기 위한 specialized tool 등등 거의 모든 tool 이 포함되어 있다.
command line tool은 더 가벼우며 terminal에서 실행할 수 있다는 장점이 있다.
heap
heap tool은 주어진 process의 heap에 allocate 된 모든 buffer를 listing 한다. 이 tool은 사용하기 매우 쉽다. 그저 PID 또는 partial process name만 pass 하면 된다. 이 tool은 class name을 식별할 수 있으므로 Objective-C로 compile 된 binary 또는 CoreFoundation-dependent libraries에 특히 유용하다.
leaks
leaks tool은 process heap을 돌면서 의심되는 memory leak을 감지한다. process를 sampling 하여 allocate 되었지만 free 되지 않은 pointer에 대한 report를 작성한다.
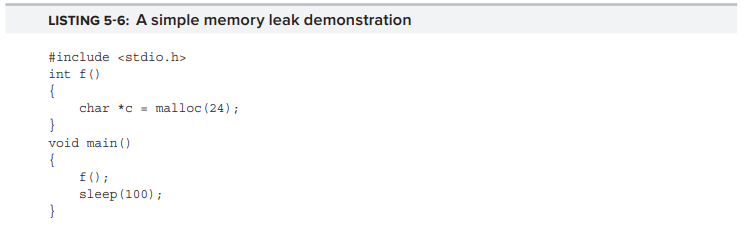
Listing 5-6과 같은 program의 경우를 고려해보자
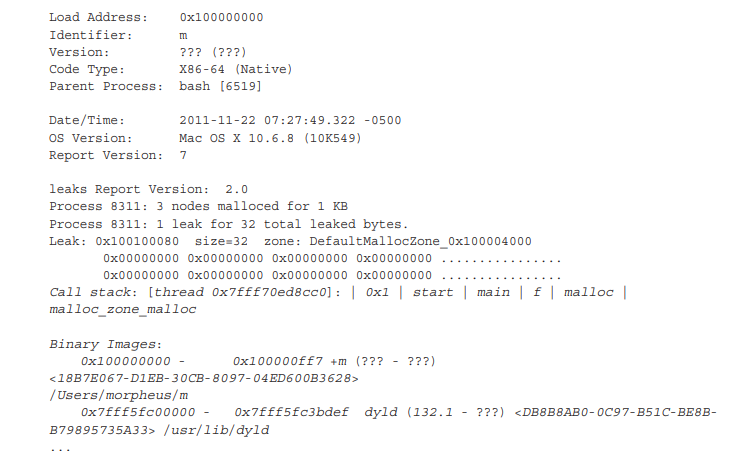
leaks 를 위 program에 대해 실행시키면 Output 5-8 과 같은 output이 나온다. italic으로 되어있는 부분은 MallocStackLogging 이 설정되어 있을 때만 display 되는 곳이다.

malloc_history
MallocStackLogging 또는 MallocStackLoggingNoCompact 를 설정해야 사용 가능한 malloc_history tool은 dyld 에 의해 initial된 것을 포함하여 process에서 발생한 모든 memory allocate 에 대한 detail한 account를 제공한다. report의 foramt은 앞에서 살펴본 sample 및 leaks 와 매우 유사하다. 실제로 -callTree argument 사용시 sample 과 똑같은 report가 생성되며 filtercalltree 로 추가적인 처리를 해줄 수 있다. call tree를 display 할 때 추가 argument는 -showContent 를 포함한다. -showContent 는 이전에 display된 leaks output과 유사하게 allocate 된 memory 내부를 들여다 볼 수도 있다.
이 tool을 사용하면 process의 모든 allocate(-allBySize 또는
-allByCount 사용) 및 deallocate(-allEvents) 를 display 하여 실제로 너무 많은 일들이 발생할 수 있음을 알 수 있다.
memory leak을 tracking 하기 위해 더욱 유용한 형식은 문제의 address만 argument로 지정하는 것이다.
STANDARD UNIX TOOLS
OS X에서는 자체 제공하는 tools 외에도 OS X 특유의 문제를 제공하기 위해 “tweaked” 된 standard UNIX utility들도 제공한다.
Process listing with ps
ps 는 BSD, System V, GNU 세 가지 버전이 있기 때문에 standard 라는 용어의 적용에 있어서 다소 유동적이다. Darwin의 ps 는 BSD 의 ps 와 매우 유사하지만 System V 와의 호환성을 제공한다. 다른 UNIX와 마찬가지로 ps 는 대부분의 알파벳 문자를 switch로 사용한다.
다음 Table 5-9 에 일부 유용한 switch가 나와있다.

System-Wide View with top
ongoing system-wide view를 얻기 위한 key tool인 UNIX top command는 OS X에서도 존재하며, Mach architecture에 adapt 하기 위한 일부 수정사항이 있다.
top 은 SIGWINCH signal handler 를 통해 terminal size에 dynamical 하게 adapt 한다.
standard terminal 에서는 Output 5-9와 같이 볼 수 있다.


OS X top 은 표준 GNU top 과 조금 다르다. PID, UID, PGRP, SYSBSD 등 BSD nomenclature 뿐 아니라 Mach에 대해서도 adapt 하다. 특히, Mach regions(MREG), messages sent(MSGSENT), messages receive(MSGRECV), and Mach traps(SYSMACH) 도 볼 수 있다. 또한 top 은 kernel-provided statistics를 제공하기 때문에 kernel이 operation 별로 유지 관리하는 page fault 및 copy-on-write fault를 볼 수 있다.
File Diagnostics with lsof and fuser
lsof 와 fuser 는 각각 특정 process 에서 사용되는 file, 특정 file을 사용하는 process를 확인할 수 있다.
lsof 는 fs_usage 에 대한 보완 service를 제공한다.
fs_usage 는 기존의 open된 file이 아닌 새로운 file operation에 대해서만 볼 수 있기 때문이다. lsof 는 process가 소유한 모든 file descriptor(socket 포함) 의 mapping을 display한다.
fs_usage 는 연속적으로 실행될 수 잇고 lsof 는 일반적으로 single snapshot을 생성한다.
fuser 는 file에서부터 file을 소유한 process까지 reverse mapping을 제공한다. 주로 file lock 또는 “in use” problem 해결이 주 용도이며, 이 problem들은 주로 “file system busy” message와 함께 umount operation의 fail로 나타난다. fuser(mount point에 -c) 를 사용하면 file system에서 file을 holing하고 있는 process를 정확하게 확인할 수 있으며 unmount 전에 반드시 처리해야한다.
USING GDB
GDB debugger는 풍부한 syntax와 강력한 기능으로 인해 모든 UN*X platform에서 사실상의 standard debugging tool이 되었다. Apple은 공식적으로 GDB를 Darwin으로 porting 했다.
그러나 Apple의 GDB port는 다소 오래된 GDB version 6.3.50에서 파생된 것이다. Apple의 GDB fork는 정기적으로 새로운 XCode의 release와 함께 update 되며, GNU version과 Apple official version을 동시에 제공한다.
GNU version은 fat binary나 PIE 같은 많은 Mach-O feature들이 부적절하게 처리된다는 점에서 “broken” 되었다. 따라서 이 section에서는 official Apple port에 중점을 둔다.
GDB Darwin extensions
XNU는 user mode에 완전한 POSIX API를 가진 UNIX-compatible persona 를 제공하는 반면, 가장 basic한 primitive의 구현은 Mach 이다. GDB는 underlying Mach structure 를 알고 있으며, 이를 display 하기 위해 특별히 적합한 command를 포함하고 있다.
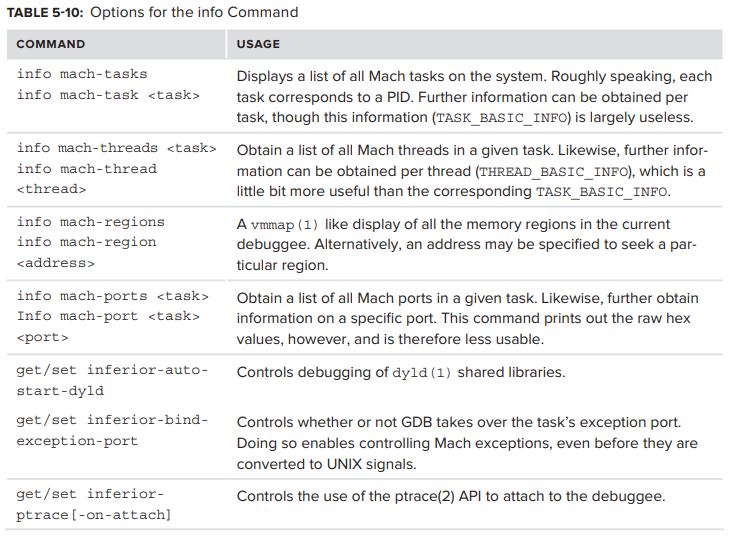
info command 는 다음 Table 5-10 에 표시된 option을 포함한다.
LLDB
Apple이 LLVM-gcc 로 전환하면서 GDB 의 대안으로 LLDB 도 도입되었다. LLDB는 대부분 GDB 와 구문이 비슷하지만 debugging 기능에서 좀 더 발전되었다.
Subscribe via RSS